Showing posts with label sewing. Show all posts

Monday, November 25, 2013

Zipper Purse - Sewing Tutorial

Is it a purse? Actually, more of a wristlet or coin purse. It's not an actual "purse" really;  the way I think of that word when I hear it is a large tote bag with pockets. If you make one, you can call it anything you'd like. Zippy the Zipper wristlet? Fred? Sure, whatever. Give it a gender and a personality too! Go crazy! Or, not. It's your call.

Let's make this! Please forgive me for the lack of macro-photo skills. I'm better at sewing than I am at taking photos. If it's blurry, just squint. It won't help, but it'll make you think it's you and not me.

Choose two long zippers. The longer the zipper the larger the purse. The zippers do not have to be the same size or the same color, but they should be the same width and have a similar zip. I'm using two long red metal zippers that are nearly the same, although one is longer than the other.

Start by sewing the zipper butts together. Is that the technical term for the end of the zipper? Specifically, the butt end? It is? Great. I thought so too.

You can use a regular presser foot rather than a zipper foot for this project. Nice of me to mention that now after you just changed out the feet, right? The zipper foot isn't necessary because you'll be sewing on the very edge of the zipper and it is out of the way enough to use the regular foot. It shouldn't be an issue. If it is, then use your zipper foot, or use wider zippers.

Now, you have one really long zipper that has a head at each end and two butts in the middle. It will not unzip all the way from end to end but that's ok. Both zippers will unzip to the middle, which is cool.

Take one head and fold it down so the zipper is folded on top of itself.  I didn't measure but folded about 3.5 - 4 inches. This is the width of your purse. Sew along the edge.
Now it looks like this:

You will be sewing in a spiral fashion from one end to the other. Once you get that first section sewn, the hardest part of the project is next. Sewing around the first bend. You can do it!

For the first corner, I pin the two pieces of the top of the zipper to where it will be sewn because those little stumps want to slide away.

Important thing to remember before you get to the very end, let's just do it now, unzip it a bit. Sew the stumps down and continue to sew the edges along the other side.


Getting started is the hardest part and you are way past that now. Pat yourself on the back! Sew around another corner, it's awkward and funny, just do it.

Spiral around and around right to the end of the next head, and you should end up with a tube of zipper. If you did not, then you screwed up somewhere and you need to get your seam ripper out and go back to the top of this tutorial and try again. Stop cussing, it happens. And I don't know where you went wrong. For the rest of you, Yay! you are almost done!

Flip it inside out and squish it flat. 

Sew across the one edge that is still open at the top of the purse. One end or the other needs to be unzipped so you can flip it back around.

Sew the stumps down. 

Ta Da!!! A zipper purse!

Oh, wait, we need a strap. Flip it around again and add a little ribbon or something to use as a strap. I sewed it to the stumps.
And then tacked it down so that it wouldn't pop up every time you unzip it for use.

For real this time:  Taaaa Daaaaa!!!  A zipper purse!
Just for fun, unzip it! 

Wednesday, November 6, 2013

Peacock Costume

Libby wanted to be a peacock, but not just any peacock, a pretty peacock!  Although this meant she would end up being a boy peacock because girl peacocks are ugly.

The fabric was some really old heavy polyester that I inherited from a lady. I haven't really had a use for it, and I figured a Halloween costume that will be worn once would be a good way to use it. That saved me from spending too much at the fabric store! I had plenty of fabric in all the right peacocky colors. I did buy one yard of (itchy) shimmery blue stuff for the top layer of the dress to give it a nice peacock glow.

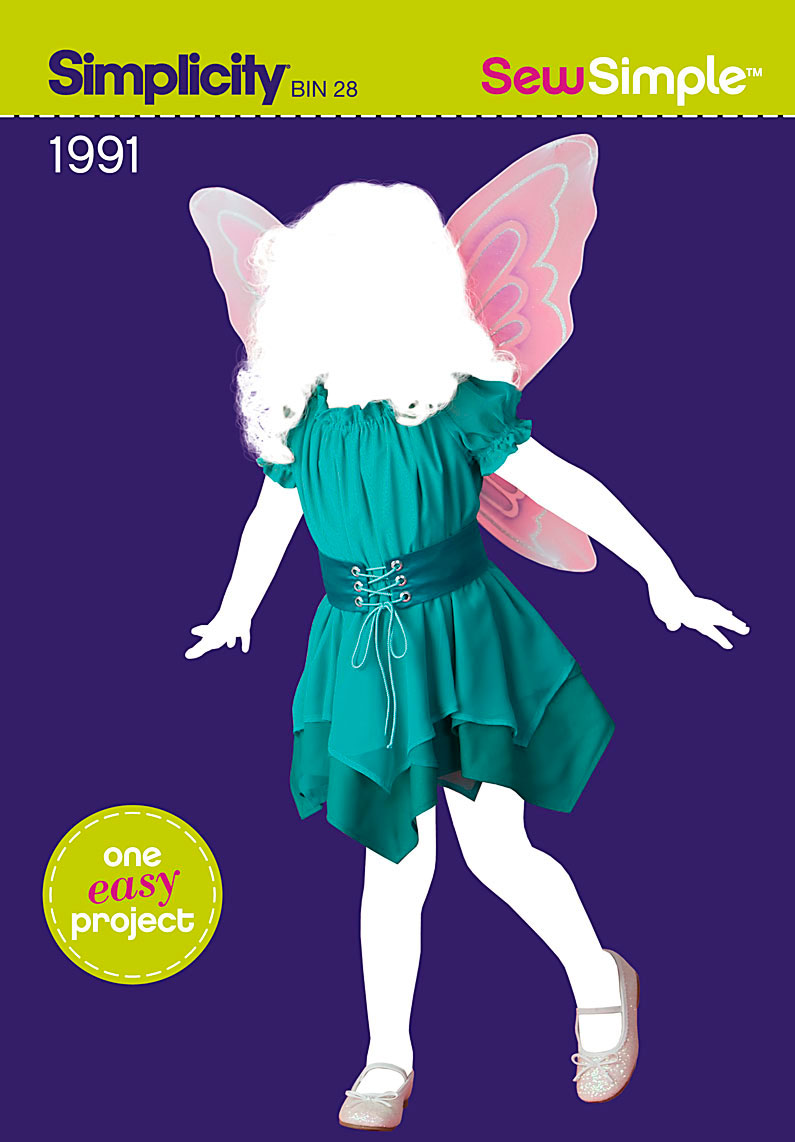
I decided to make a pretty little fairy dress as the peacock body and add the tail as an accessory. I used Simplicity Sew Easy 1991 for the body/dress.  This dress looked very easy and I thought I could throw it together in one day, which equates to about an hour's worth of sewing for the normal sewing artist (i.e. one that does not have three kids running amuck). I was so wrong. It's actually harder than it looks; I would say it is an intermediate sewing project rather than an easy one. But it certainly isn't hard. It just has a lot of pieces and a lot of layers.

Once I finally finished the dress, I couldn't believe it. It's soooooo not cute. The finished dress is three times wider than any kid! The belt cinches it together, but without the belt, it's just wider than wide. I thought about pitching it and starting over, but I was pressed for time. I really only had $6.99 invested in it (the shimmery piece), but I also had three days of sewing invested in it. Ugh. I decided to remember that it's just a Halloween costume and it would do nicely. It doesn't have to win a contest or anything. I certainly won't use that pattern again without making some huge alterations to the bodice and skirt pieces. And I would never use a thick polyester. It just doesn't hang well. The photo on the pattern is of a fabric that drapes well when cinched and hung. 1970s polyester was probably never intended for its use.

Just now, as I am typing out this sewing tutorial, I see that I screwed up the skirt. It has all of the pointy parts of the skirt lined up. I alternated the hem points. Eh, whatever. The kid didn't notice.

On to the tail.

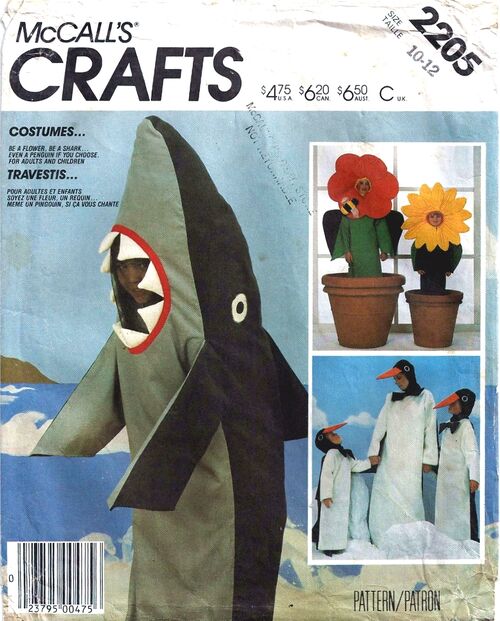
I used an old Halloween costume pattern, McCalls 2205 for the tail.  I chose the piece for the daisy flower head and folded it in half using three pedals. I cut two of those and added peacock feather applique to one side of the tail/flower.  I wish I would have done both sides, but one side seems to have been ok. I just winged it on the applique process. I didn't do much except to lay out the improvised peacock feather pieces and sew them down. No fusing or anything. They might be a bit crooked. After decided the dress was ok as it was, any further imperfections were easy to overlook. Besides, time was not on my side.

Once I had one side of the tail decorated, I grabbed up a piece of white posterboard (we all have that lying around, right?) and I cut out a piece of posterboard to the same size as the tail, with seam allowance.  Now I had to decide if I would sew the seam to the inside and flip it all around for nice pretty seams, or just sew around the outer edge and let the seam stick out.  Since I was on a roll with this whole "good enough" attitude, I sandwiched the poster in between the top and bottom tail pieces and sewed around the outer edge leaving the seam exposed. The posterboard is forever stuck inside the tail now. Sure hope I don't need to wash it for any reason!

I sewed the tail to the belt and the costume was done!  With the tail attached to the belt, she could flip it up or lay it down. Just like a real peacock!


Friday, November 1, 2013

Halloween 2013

Did it! Survived another Halloween! At the end of the night, I sighed with relief that the day went so well. Two awesome school parties, three adorable hand made costumes, trick or treating, a big pot of chili, fun with friends and neighbors, and tons of candy. And, my husband seemed to enjoy his birthday even though it was, as usual, a side-event after trick or treat.

It was a good one. 

My kids go to an awesome Montessori school. They have a lot of kids from various walks of life and like most schools, they do not celebrate Halloween at school.  I am glad about that. I like that the school respects those who do not do Halloween, and I like that my kids are learning to respect others in this way. But, they do something else that fits in with Halloween and the kids who do celebrate don't miss out on festivities with the alternative. This school is pretty cool!

Happy Non-offensive Fall!

The kindergarten kids study animals. Each student chooses an animal and does their own research and learning at home about that animal. On the last day of October, they dress up as the animal they chose to learn about and present what they learned. All of the kids wear their project costumes and the parents bring in treats for the autumn project party. At the party, the kids are encouraged to mingle and ask  each other about their animal.  Even the party is educational!

Libby chose to study a peacock.  We read about peacocks, looked at pictures, looked online, and we went to a dairy farm where they have a couple of peacocks in a pen. Libby asked the farm hand what peacocks eat and he told her they feed  them "mash" which is smashed corn. I made her a peacock costume and she made a poster for her presentation.

The lower elementary classes (grades 1,2 3) had a project called "Time Machine".  Each student chose a culture and time from the past and studied it. They could choose anything they wanted. At the end of the month, each student dresses as a person from their chosen time and presents what they learned about the history of the culture.

Gracie chose Ancient Egypt.  She watched a Brainpop video, read about it, and we went to the Museum of Man and explored the exhibit with the help of a docent. She learned a lot about ancient Egypt and the culture of the Egyptians.  She designed her costume and I made it the way she instructed.  As it turns out, Ancient Egypt was a popular place to go in the time machine! Several of her little classmates also studied the same topic. They had fun talking about what they learned and comparing.  At their "party" the kids all gather together and the parents go around asking students about their chosen historical period. Then the kids mingle and are encouraged to ask each other about their character's life. It's really a cool project and the kids learn a lot from each other.

Charlie is only three years old, but he is a wise little boy. I repeatedly asked him what he wanted to be for Halloween hoping to hear pirate or superman or Winnie the pooh, or something easy and popular with the tots. He was consistant with his request: He wanted to be Sandy, our dog who passed away in July.  He couldn't just be any puppy dog, he had to be Sandy. Luckily, I found some soft minky fabric in the right color for the costume. It had little swirls so it might look like a sheep, but it was soft and the right color and that was the best I could find, so I got it.  He loved it! He kept hugging the fabric and thanking me before I even had the costume cut out!

Charlie has this whole "Gramma can make anything" thing figured out! He told me just how to make it with ears like this and a tail like this and paws, wait, no paws, yes, paws. He couldn't decided about the paws, so I attached paw mitts that had a hole for his hands to escape if he wanted them out. Happy Puppy! Guess it was a good thing I didn't talk him into another costume.

His Sandy costume turned out pretty good. A bit sheepish, but mostly dog. He woofed and panted and gave puppy kisses. Had the day been a bit cooler, he might have worn his puppy costume all day long. He wore it to the school parties and then donned it again for trick or treating.

Just like every year, our first trick or treat stop is next door. The neighbors spoil my kids! This  year they gave the kids a candy necklace making kit. They're gonna love that! Keith took the first trick or treat shift and walked the kids up the street and back and they filled their bags. They took a break at home and shoved as much candy into their mouths as they could, then I took them out for round 2. I took them in the other direction. Once again, they filled their candy bags. Libby was exhausted by the time we got back home.  They each ate a couple of handfuls of candy, and it was off to bed.

The kids  had a blast!  Keith enjoyed his pot of chili and cornbread. The neighbors brought him a growler of beer from a local brewery. He also got a card in the mail, and the only thing he had to say about that was "it's not from your mom? that's weird. She must be slacking!"  We never did get around to eating his birthday pumpkin pie, but it was a school night and everyone was stuffed and tired so we'll do it later. 


Sunday, October 6, 2013

Princess Mulan's Matchmaker Hanfu

Made It!!!

The girls have been wishing for Princess Mulan dresses for quite some time. I finally found time to get to the fabric store and while I was there, I actually remembered to grab up some pretty blue fabric for the waist band. Really, that's what the big wait was all about. I've had the pink satin and the red trim for quite some time.

I only made one dress because my older girl is growing out of the dress up stage and she would rather wear something normal but themed. I haven't figured out what to do for her yet, but I did buy some Star Wars fabric for when I figure something out. In the meantime, only one hanfu is in order. Which works because Libby's 5th birthday was quickly approaching so the dress could be a gift. 

It only took me a couple of days to make the dress, which would equate to a couple of hours in normal person time. It's been proven many times that I am not functioning in any level of normal, sewing or otherwise. But it should be noted that it was a quick project.

I used a normal looking dress pattern, mainly for the measurements of the shoulders and sleeves and bodice width. The hanfu does not at all resemble the pattern I used, but I am growing out of a need for much of a pattern; I just need the major cutting points and then I can wing the rest of it.

I made the hanfu just like a dress in that it has a top bodice section and a bottom skirt with a zipper up the back. I'm not so sure that is the proper way but I wanted it to have some flair at the bottom and I wasn't so sure a shift or A line cut would have the same effect. Besides, the gathered waistline would be covered by the waist band so it didn't really matter. I also made the skirt ankle length (or so I thought until my kid put it on and I discovered her legs are a lot longer than they used to be!)

I cut the sleeves the right length and then added "bat wings" to the wrist. I also made the tip of the wings longer than the top of the wrist so that it resembled Mulan's long sleeve tips without going overboard. Just a bit of effect for authenticity but not enough that it would be annoying to wear.

The bodice top gave me some pause. I had to think about how to make it overlap like a robe. I ended up cutting four bodice pieces and then folding them and ironing them down the way I wanted them, trimming off the unwanted half at the diagonal and stitching the two pieces of bodice together at the waist. It has a lining of the same satin, which is why I needed four pieces. Two outer and two for lining. There is probably a hundred easier and more conservative ways to cut the bodice out, but to keep it straight in my mind, that's how I did it. I will have to practice or draw up a little pattern piece.

I used some of the leftover cheap red stuff that I used for the Captain Hook Halloween costume last year to trim the bodice and make the red waist belt. The embroidered blue piece was easy to make into a waistband. I measure the child around the middle and made a rectangle to match. I sewed the red band to the middle of the blue rectangle and added apron ties.

Now I had the pink satin underdress with the red trim on the bodice and the separate blue and red waist band. Done!

There were just a couple of problems. I forgot the red upper skirt and the waist band slid straight down that satin covered kid. It wouldn't stay up.

I added a piece of gathered red to the bottom of the blue waist band and that fixed that issue. Then I tacked the waist band to the dress in the back, front and under the arms to keep it from sliding down. We don't need to spend all day yanking the waist piece up over and over again. Now, it's done!

Princess Mulan's pink hanfu was an awesome birthday gift for my little birthday girl! We hauled it around all day at Disneyland on her big day, but it was too hot to wear satin. Also, Mulan wasn't "home" when we went to the Princess Fantasy Faire. In the evening when it cooled down, she put her hanfu on over her clothes in lieu of a jacket.  It was so cute!  We sure heard a lot of compliments in the couple of hours that she wore it and her little friend instructed me to make one for her and her sister.

Happy Birthday to my little princess!

*** UPDATE ***
11/8/2013

My little Mulan met the real Mulan at Disneyland. Mulan saw her and gasped with excitement! She was like a little princess on Christmas morning when she saw Libby in her Mulan hanfu! Very exciting! Here are the princess twins together:


Thursday, October 3, 2013

The Redondo Twirly Skirt -or- Spin till you are Dangerously Dizzy


This skirt is dangerous!  Dangerous if you can't handle being dizzy, that is. I cannot; therefore, I will not wear one. I will not spin and twirl.  My daughter will. She's five; she can do that.

The first time I saw this skirt, an adorable little girl in my daughter's kindergarten class was wearing it. The next time I saw her, she had another one on. Then another. Her mom sews!  I got to know her mom a bit, but I forgot what she said her name was. That's ok, I just call her "The Redondo Mom" because of the skirt. Well, I don't call her that, I just refer to her silently in my mind as the Redondo Mom. Pretty sure she wouldn't answer me if I actually called her that out loud. Yeah, that might not be so cool.

That was 2 years ago. I've been thinking about that skirt ever since. It's that stinking cute! 

Recently, Redondo mom shared the pattern with me. I was so excited! Like, Christmas morning (after coffee) excited! I traced the pattern, all sizes, then traced another one for a friend of mine who has two little twirly girls, and returned the pattern unharmed by my crazy children.  They'd find it and spill something on it for sure.

The skirt consists of three pieces. One is a rectangle, I totally understand that one. It's the waistband. The other two pieces are completely confusing.

I've been sewing for 21 years now. I've seen so many patterns and could most of the time put them together. This one had me completely baffled. The two skirt pieces look like partial snail shells. I held them and tried to figure out how on earth they make a skirt, and how they fit together, which way is up, which end goes where... yeah, I don't know.

I followed the instructions very carefully. Rechecking every time I put things together. It never made sense. I put the curves together even thought it felt like I was making mistakes. They didn't look like they wanted to line up. But, that's what it said to do.

First, I made five swirls, then put those curly panels together and you'll never guess what! It totally made the cute little skirt! Perfect!!! I'm not sure how that happened when it felt so weird. I really need to practice sewing things that have no straight lines. This was a step out of my comfort zone. Which made it especially satisfying!

Then I tried out the pattern on the largest size pattern. It was so sweet! But it turned out too long for my little spinner. Hmmmm....  Let's try again.

I now knew which end was up, so I shortened that end. I also cut the pieces a wee bit skinnier and made one more for six panels. Then I cut two types of fabric for the panels so they could alternate. Of course, I cut a couple of pieces backwards and had to recut them. I'm learning.  I sewed them together and next thing you know, skirt #2 was done!  Score! It looked a lot better than the first. In fact, it looked good enough to wear.  We gave it to a little girl for her birthday.

Then, I made a third. This is fun!  Skirt #3 turned out just  as good as the second one and I love it! More than that, the girls love it!  The largest size fits my smallest girl, so I'm going to have to figure out how to expand the pattern for my bigger girl. She likes to twirl too.

The skirt doesn't take long to sew. Maybe an hour or two at the most. Of course, it takes me longer because I have to keep three kids from taking all my pins out of my pin cushions, cutting up my fabric scraps, running hotwheels under my sewing table (over the pedals) and keeping the Barbies from climbing all over my ironing board. Slows down the sewing a bit.

I cannot wait to make more Redondo skirts! Thank you, Redondo Mom! or whatever your name is.

Sunday, July 28, 2013

Grandma's Pajamas


My grandmother asked me to make a pair of pajamas for her and I accepted the challenge. It was nice to have a sew something different for a change.  The whole time I was sewing her pajamas, I really enjoyed the project and I kept thinking I should sew up a pair for myself! I think I will!

Honestly, it took me way too long to finish these pajamas. I should have been able to do them in a much shorter amount of time but my sewing time has been very limited these past few months. I'm so glad I finally finished them! Now I just have to get them in the mail. My grandma has more patience than anyone I know. She must, she's still waiting for her jammies! I'll send them soon!  I just need to get someone to take them to the post office for me. Any volunteers? (I can't carry a package into the post office while on crutches)

My grandma sent me her measurements and her fabric preferences. She sent along one of her favorite pajama tops to use as a pattern too. I used the top to decide what type of fabric to get and of course, used it as the pattern for the top.

I took the kids with me to choose fabric. I was in charge of what it felt like and they were in charge of what it looked like. Good plan. But, they both chose something different. No problem, I'll make two pair! And, I did.

Cutting out two of something is just as easy (or hard) as cutting one. So, might as well cut two! The problem was that I didn't buy enough fabric of either print, so had to run back to the fabric store for more. Luckily, it was still in stock. 

The pajamas are two piece sets. Pants and a blouse.

The pants were easy, but I am worried about the fit. I really hope they fit nicely. She sent measurements but I had a hard time with the pantleg to waist ratio. It didn't seem right and when I finished, I feel like the waist should have been wider to allow more of a gather in the elastic waistband. I don't know; I'm just nervous that they aren't quite right. I will see what she says about the fit and try again if needed.

The top was more difficult because of the collar, but I finally figured it out.  I put the collar on wrong the first time I tried it and no matter how I tried to figure it out, it seemed wonky. I had to look it up in my sewing book! I like figuring things out on my own, but I do have a couple of nice sewing books that explain just about everything.  I looked it up and it was so easy! Why didn't I figure it out!

The collar has to be sandwiched between the neckline and the interfacing, and then it is perfectly placed and the facing lies nicely too. OOooooooh. Of course!

The other difficult part, intimidating actually, was the buttonholes. I don't have a buttonholer on my machine so I had to zig-zag the buttonholes on my own. I love my vintage machine, it runs like a dream, but now I'm longing for an automatic buttonhole feature. My buttonholes might be a smidge different but they are all pretty close to the same. I had to make 8 of them!

I added two good sized pockets to each top for hankies and mints and other things.

The pajama tops turned out great! I hope they feel good and fit nicely. I'm looking forward to giving them to my grandma and hearing if she likes them or not. If they don't fit, I might just have to pack up my sewing machine and go visit!


Sunday, July 14, 2013

Super Baby Capes


We were invited to a birthday party for Ian and Alina, cute twin babies turning one year old.  I am currently challenged as far as shopping goes (I haven't figured out how to hop a mile through the aisles of Target on crutches). So, I turned to my trusty sewing machine and my pile of fabric and hoped something quick, easy and thoughtful would happen.

It did.

I remembered that a few months ago, the mommy of these adorable twins sent me a photo of a kid wearing a superhero cape and she mentioned that it was cute and something I could sew. I really didn't give it much thought at the time. But, now the idea resurfaced.

I just pretended that I knew what I was doing. It's amazing how often that works. I used my scissors and just cut out a large bib shape of red velveteen type stuff (leftover from the Captain Hook Halloween costume) and the same shape from some glitter infused red poly-satin. Then I cut out an I and an A from a scrap of blue. Also, cut out two white circles. Using fusing to stiffen the circles and initials, I appliqued them to the outer part of the cape.

Then, I sewed the liner and outer cape together, flipped them inside out and topstitched. After that, I searched frantically for velcro.

No luck. No velcro!

Snap tape to the rescue!  It isn't ideal for this project, but with the birthday party only minutes away, it would have to do.

There you have it.  Happy Birthday, Superbabies!  Faster than a loaded diaper, it's Super Alina and Super Ian to the rescue!

Wednesday, July 10, 2013

Sewing Stinky Bags

My daughter is turning into a hippy. Long hair, baby wearing, openly breastfeeding, Prius driving, organic veggie eating and cloth diapering. Kinda like her mom!  (kinda)  I'm so proud of her!

I have never been courageous enough to use cloth diapers! Even the thought of cloth diapers makes me want to run away screaming. I'm a big believer is using disposable dipes and getting rid of them as fast as possible! Wash 'em? Ewww! Not me!

But for those who do use cloth diapers, there is a need for this thing called a "wet bag" to store the wet stinky diapers in while on the go. Then when you get home, you add them to the mountain of wet stinky diapers waiting for the next laundry cycle. The wet bag is outing survival gear. It's a must have! Seriously, you wouldn't want to tote your soiled diapers in a ziplock baggie or a plastic grocery sack would you? No! Those are disposable plastics - that would defeat the whole purpose of going with cloth diapers. I'm having a hard time grasping the concept too.

My daughter wanted some wet bags since she's just starting this whole cloth diapering thing. She was using disposables before and recently discovered that she could be even more of a hippy by going with cloth and doing more of the one household chore she hates: laundry.

What's a mama to do but sew some cloth diaper wet bags for her little girl and make her a happy mommy.  I do enjoy spoiling my girls with whatever they want from my sewing room!

I picked up some PUL at the fabric store a while back. I was going to make her some wet bags before she started using cloth diapers but I was thinking of swim suits and that type of wet stuff. it's nice to have a place to store wet things especially if you take a trip to the beach, pool or splash pad. I guess she can use these wet bags for that purpose too. Wet is wet.

PUL is polyurethane laminate. It's fabric that is sprayed with plastic. Nicely water resistant! It's also not cheap. It's not so expensive that it is out of reach, but you don't want to waste any, that's for sure.

I made four wet bags for Katie of varying sizes, and one bag that would hold a small item or some wipes. Two of the bags I used just the PUL and two of the bags I used scrap fabrics on the exterior and PUL as an interior lining. One bag was lucky enough to get an outside pocket for dry items. That was her idea, and I was nearly done sewing them when she told me that a dry pocket would be nice, so only one bag ended up with a pocket.

All of them have a plastic zipper. The zippers are all from my stash and so they are whatever I had on hand, not necessarily the best color choices and not all of them heavy duty sports zippers. That would have been ideal.

Anyway, the wet bags were simple. They are just rectangles with a zipper. I didn't use the serger on the bags because the PUL sort of hugs the needle and I thought the last thing I need is a serger problem, it's a finicky machine. I just used the sewing machine. I doubt there will be any fraying issues.

I also added a loop for carrying or hanging on the stroller. Since the wet bags will be filled with wet diapers, they might be kind of heavy and the loop might need to be strong if she uses it to function as more than a decorative touch. Because it will be utilized to hold a lot of weight, I made the standard tube out of fabric, and then threaded an athletic shoe string through the middle of it. That should be durable!

I enjoyed making the bags. They're cute and practical. Plus, they were easy and a nice break from my other sewing project in progress. Plus, I made my daughter very happy! She is such a good mommy to her sons that I don't get much of a chance to help out. Seems she handles parenting with such ease.

Sunday, June 16, 2013

Sewing Long Swim Trunks

I looked and looked and looked online, but couldn't find any swim trunks that have full leg coverage. There must be boys that have sensitive skin or just want long pair of swim pants, aren't there? Guess I found a niche market that isn't being served.

That's ok. I have a sewing machine and I know how to use it!

I bought two pair of men's swim trunks (because the fabric is cheaper this way and the variety of fabric is more plentiful) and cut them down to size. I also cut out the mesh panties, or underwear as men say. Then I stitched them up like a little pair of pants, added elastic to the inside of the waist where there was once a drawstring. I attached the decorative waist piece and had a wonderful pair of little swim trunk pants! Perfect!

I ended up cutting the back pocket because of where it lies on the trunks, it was in the way. No problem, it just became a smaller back pocket and the raw edges were sewn into the center seam. Not all pockets go right to the middle of the pant, but I'm not going for perfection here, just improvising and the pocket isn't all that noticeable after all. Funny, it's still perfectly useable! 

I think one pair turned out great, and the other pair looks like clown pants. The striped fabric didn't look as good in the small size. Oh well, those will be the back yard run through the sprinklers and get muddy swim trunks.


Ta Da! Swim Trunk Pants!

I'm so happy that I was able to sew something for my grandson to meet his special needs without compromising his fun and he still looks a lot like all the other little boys at the splash pad. Lookout, world, we're going to have a fun summer!

Sunday, April 21, 2013

Princess Merida dresses

Fresh from under my sewing machine - a dress to "change your fate!"  The perfect dress for "climbing Crown's Tooth and drinking from the fire falls". Just right for a girl who wants "to stay single, hair flowing in the wind while riding through the glen firing arrows into the sunset."

I may have seen the movie Brave a few too many times since the dialogue is so easy for me to quote!

I started working on these dresses a long time ago. The fabric came from Joann Fabrics and was probably a seasonal print. It's various shades of dark green with a clover print. I don't remember where I got the gold; it was either Joanns or Hobby Lobby. The green is a cotton broadcloth and the gold is a glitter infused polyester. Unfortunately, the gold is rough and itchy.

I raided the donation bag (why do we always have a bag of worn, neglected, unloved clothes? I always think I cleaned out all the old stuff, and as soon as I donate it all, we start another bag)  for old black Tshirts. Score!  Lining for the dresses is soft black Tshirt cotton.  I lined the front of the bodice, and the inside of the sleeves with what I cut from the Tshirts. I had a bit of the bottom of a bright yellow Tshirt from a day that I trimmed off the bottom of a Tshirt to make a comfy play dress for my daughter (that she has not  yet worn, arg) and lined the backside of the gold collar ruffle. Ahh, anti-itch softness next to the skin! My girls are officially spoiled!

I didn't have a pattern to work from, although there's probably one out there on the market. I just decided to wing it. After carefully looking at pictures of the dress from the movie, the Disney store, and the princess herself in Disneyland, I came up with what I think is authentic yet kid-friendly.  In the movie, Merida rides her horse, climbs a mountain, goes fishing in the creek, runs, jumps, eats, and more all in this dress. My kids will be just as active in it, but I'm keeping them off of horses and away from bears.

The sleeves and shoulders were the most difficult part of this dress. I cut the sleeves in half and then cut out a good three inch strip from each. Once I had a lower and an upper sleeve, I inserted a strip of gold in a lightly gathered sort of way. I also made little belt loop type strips and stuck three into the mix to make it look suspended. For the shoulder suspension, I just added the rufled gold strip on top of the shoulder seam and it worked! I'm happy with the way the sleeves and shoulders turned out! I opted not to add gold to the wrists too; let's face it, these girls are going to drag the edges of these sleeves through ketchup, chocolate, dirt, and many many other sticky things. The laundry factor plays a role in the design as well.

After making four lovely suspended sleeves, I added two of them to Libby's dress. The next day I discovered that they just looked weird somehow. Low and behold, I put a size 4 sleeve on the left and a size 8 sleeve on the right! The joys of making identical dresses! Since her arms are both the same size, I had to fix that.

I was going to put the sleeves on Gracie's dress, but it was 86 degrees out and the forcast looks about the same for the next week. Summer is coming too. What was I thinking making lined long sleeves for a girl who never gets cold? I decided to put her long sleeves in the bottom drawer where they will never be seen again, and give her a sleeveless Merida dress. I gave the dress some little cap sleeves, even though I vowed to never do that again because the cap sleeves crack me up too much. They are so funny looking! They stick out like little wings. But, it works on this dress and with the gold on the shoulder, there had to be something. She didn't want short puff sleeves, so funny little wings it is. That's ok, laughter is good for me.

I could not find a good ribbon for the bottom hem. After searching and searching, literally for months, I settled for the black ribbon with a Greek key pattern, or maybe it's Egyptian. Greek/Egyptian ribbon and Irish clovers on a Scottish princess dress. Eh, the kids will never know.  The ribbon does give the hem a finished look and the Disneyland Merida has lots of fanciness at the bottom of her dress, so I had to add something.

The belt is just some brown polyester and I made a gigantic button out of a piece of cardboard covered with the gold fabric. I'm not entirely happy with it, but once I get the plaid piece attached, that will make it much better. Merida has a Scottish plaid hand-towel or snuggle blanket or handkerchief something to that effect hanging from her belt. Whatever it is, I'll make one and attach it. I did not realize that blue/green plaid would be so hard to find in the spring. So far, no luck. I might have to add a blue/green floral print instead. I believe the plaid symbolizes the family clan and if that is true, our clan pattern will be flowery. Why not!  In the movie, she has a quiver hanging from her belt, so if I cannot find a good clan piece, I'll whip up a quiver instead. I love having options.

I put a metal zipper on my four year old's dress and she promptly told me, "Can you make a placket for the zipper so it won't touch me?" Yes, child, you can have a placket. Any four year old who knows what a placket is deserves to have one.

I've decided the ultimate finishing touch would be for the girls to have mops of big red curly hair. Yeah, umm... no. they'll just be wearing the hair they were born with: straight, tangled, mousey-brown. Maybe a red hair clip?

All  that is left to do is take these dresses for a test run at Disneyland. Once the girls put them through a full day of activity, eating, sweating, spilling and such then we will know whether the dresses are a success or not. Stay tuned!

*Update:  I found a piece of plaid! A long lost pair of winter flannel pajama pants resurfaced from the depths of my dresser drawers. The two legs became the plaid kerchiefs and now I have a pair of plaid pajama shorts! Ta-Da!

Sunday, January 27, 2013

Charlie Brown is a Blockhead

I was asked to make a Charlie Brown dress for a little girl who loves Charlie Brown. Of course I said "yes"! She wants a simple sleeveless shift dress, just yellow with the stripe. What? No frills? Sounds easy!

I asked Libby if she wants a Charlie Brown dress too; how could she resist? It's her favorite color! Without hesitation she said, "No. I do not want a boy dress."

I found exactly the right color fabric. Awesome! Hobby Lobby didn't have any yellow or gold zippers, or anything remotely resembling these colors, luckily I have a large zipper collection at home. I bought extra fabric just in case I screw something up and  have to recut a piece, or if Libby decide she wants a Charlie Brown dress too, or if someone else asks for one after seeing it. Always good to have more than you need. I also picked up some black flannel for the stripe.

The yellow dress is easy enough, so I quickly whipped up two of them (leaving the sides open to add the stripe). I had two 7" zippers of just the right shade of yellow/gold, score! I made a pattern for the chevron stripe and cut out a few of those. I thought it would be best to applique the stripe to the dress. Before affixing the stripe, I wanted to finish the edges of the flannel with a 3-thread rolled hem.

This is when I decided that Charlie Brown is a blockhead. The chevron stripe was HARD to edge! I started at each peak and serged through the troughs to the next peak. It is impossible to pivot on a serger because of the knife; I have seen some tutorials and sewing shows where the sewist pivots at the peak of a corner, but I couldn't do it for the life of me. It looked awful, so I began and ended at each peak. Beginning to feed a peak into the feeddogs is tricky. The point wants to buckle and crumple. Not pretty. But, the peaks were a cinch compared to the troughs.

Serging in the trough is like performing a magic trick. I couldn't find much in the way of instructions online. I did find some tips to serge the inside of a corner, and a trough is just a super tight corner so that is the advice I followed. The trick to it is to straighten out the line, pinching the fabric up where the trough is. Then, serge right through it. It's not as easy as it sounds. Supposedly when  you straighten it out, it's just perfect, well, not always. Sometimes it looks like you chewed on it.  I figured out that it also helps a great deal to move the knife as far away from the edge as possible so that it doesn't cut quite as close. After three days of serging chevron stripe edges, I was feeling some angst with Charlie Brown's fashion choice.

Got it done though, the stripes looked good enough to use on the dress! I think they do anyway, or else my standards were drastically lowered in the attempt to finish the striping.


I applied the stripes to the dress front and back and then sewed the sides of the dress together. ARG! The stripes do not match up! Darn chevrons! I contemplated making a third dress. It really sounded like a great idea.

I cut more chevron stripes, this time I cut them twice as long so that it could wrap around and only have one joining seam rather than two. Why didn't I think of this before?  Back to edging the chevron.

The first trough I edged didn't go well, which means I have to cut another entire stripe from the flannel. At this point, I was running out of flannel, and I started to question my sanity. I made another decision that a third attempt was crazy and I will just fix the other dresses or learn to like them with the stripes not perfectly lined up.

My husband looked at them and said the stripes were ugly. His sound advice was, "you should put a rolled hem on the stripe". I did! The flannel is a little fuzzy though, and there are minute bits of fuzz on the edges, as any flannel will give you. But, I thought it looked pretty clean. He rethinks and advices that I should add them in like a star quilt, or hem the chevron stripe instead of putting a rolled edge on it, and make the dress more fitted instead of the A-line shape and gather the skirt under the stripe. He's full of grand ideas.

His ideas went nowhere fast. 

The dresses need that finishing touch, a ruffle at the hem. Charlie Brown wears black shorts so I added a black ruffle to give it the same underlined look. I also added sleeves to the spare dress and made a bias tape to finish the necklines and armholes of the sleeveless dress. Hey, they don't look too bad!

I had Libby try it on to check the size. Too long. Oh Lordy. I cut off the ruffle, trimmed the dresses up about and inch and a half, put the ruffles back on, and yes, they look much better. The stripe is lower now, but I like it there. 

I hope the person who ordered this dress will be happy with it. I am not charging her much since it is far from perfect and it was a good learning experience for me. I would have had to pay tuition to learn how to put a rolled edge on a chevron stripe. I think the dress will photograph well, and that's all that matters, right?

I cannot wait to get rid of this dress. But, that's not likely to happen. Libby loved it and claimed the spare as her own!  Good thing I made two!